When you enter data in a form, the data is saved in the form in the repository as either content or attributes, or both. If data is saved as attributes only, the form will have a file size of zero (0).
To enter data in a form:
If at any point Webtop prompts you to accept Documentum applets, click the appropriate buttons to do so. Please read all prompts carefully.
Navigate to the form in the repository or task.
If the form opens automatically in a task, go to the next step. Otherwise, open the form by doing one of the following, depending on the options available:
On the form’s line item, click Edit.
Check the form’s checkbox. Select File>Edit.
Enter information in the form as required. A form can include any of the following:
Text box (shown with formatting buttons)
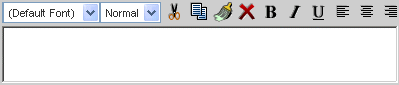
You enter text by positioning your cursor in the text field and typing. If formatting buttons appear, you can format text. To format text, see Formatting the content in a form.
Selection list

You click the down arrow and select the desired item:
List boxes
Single-selection list box

You click the desired selection. (If a radio button appears next to the list, you must click the radio button to include the selected items on the form.)
Multiple-selection list box
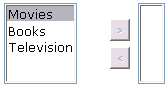
You select an item and click the arrow key to move the item to the right-hand field. You can move multiple items. (If a radio button appears next to the multiple-selection list, you must click the radio button to include the selected items on the form.)
Optional-entry list box (shown with radio buttons)
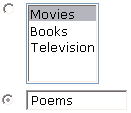
You can enter your own entry. If radio buttons appear, you click the radio button to include your entry on the form.
Attachment selectors
Single attachment

You add an attachment by clicking the Add link and selecting the attachment in the selection page. (For details on using a selection page, see Finding an item on a selection page.)
Multiple attachments

You add multiple attachments by clicking the Add link and selecting the attachment in the selection page. (For details on using a selection page, see Finding an item on a selection page.) You remove an attachment by highlighting it in the list and clicking Remove.
Checkbox:

You select the checkbox to include the option on the form.
Radio buttons (shown with text box):
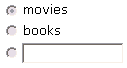
You select the desired option by clicking it. If a text box appears, you can enter your own option. You must then click the option for it to be selected.
Calendar button (shown with selection lists for time):

You click the down arrow and then select the date from the calendar that appears. In the calendar, you can move forward or backward month-by-month by clicking the arrow keys.
If selection lists appear next to a calendar, you can select hour, minute, and second, in addition to the date.
Auto-calculation button. Calculation buttons allow you to perform a numerical calculation on entries you have made in text fields. If a calculation button appears, you click the button to perform the calculation. The button’s label is determined by the form template.
If you want to clear your changes and start over, click Reset.
When you are done entering information, click either Save or Submit.
If Webtop prompts you to confirm, click Yes.